
Low Light Photography With My Old Pentax K5 II

Low Light Photography with the Pentax K 5 II
How to Get the Best from a Classic DSLR After the Sun Goes Down
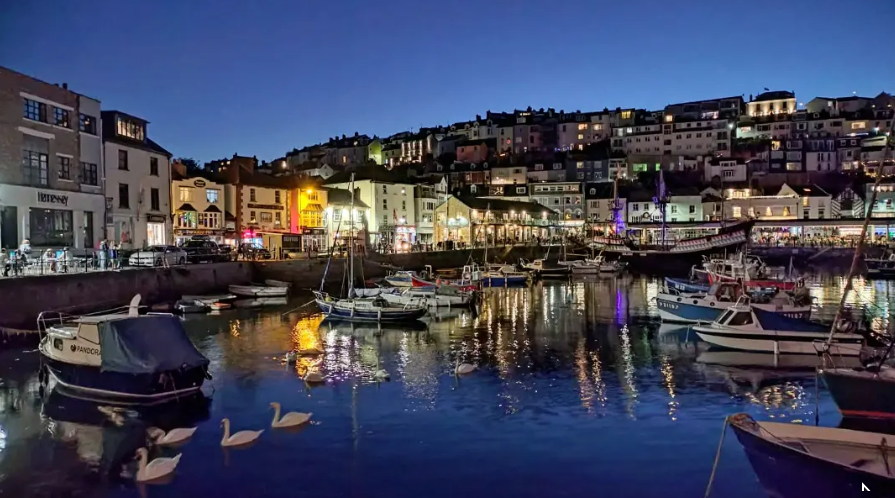
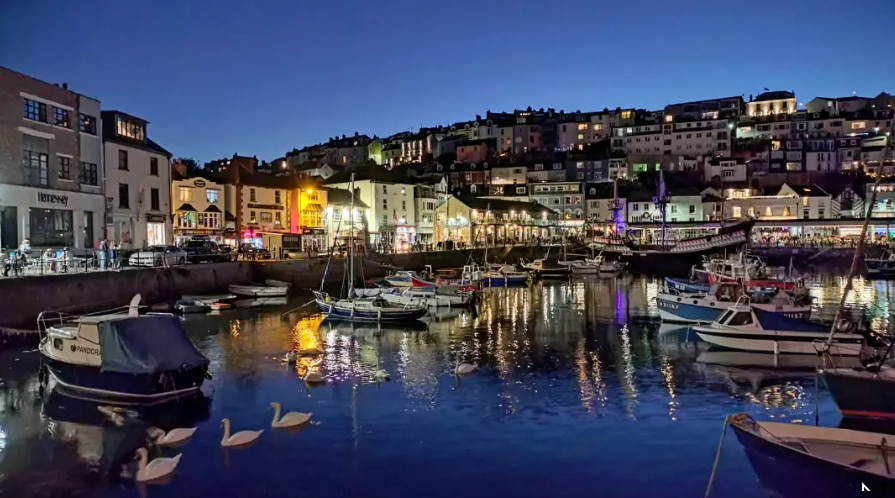
There is something special about photographing a place just as daylight begins to disappear. Colours deepen, artificial lights start to glow, reflections become stronger and familiar scenes take on an atmosphere that simply is not there in the middle of the day. The two photographs from Devon accompanying this article are a perfect example. Boats sit quietly in the harbour while lights from the waterfront buildings stretch across the water in broken streaks of yellow, white, purple and green. Above them, houses climb the hillside beneath a deep blue evening sky. In one image, a group of swans drifts through the foreground, adding a wonderfully natural contrast to all the artificial light around them.
This is exactly the sort of photography where the Pentax K 5 II can still produce beautiful results.
The K 5 II may now belong to an earlier generation of digital cameras, but that does not mean it has become obsolete. Far from it. Its 16 megapixel APS C sensor has excellent dynamic range, very respectable high ISO performance and, importantly for low light work, Pentax's sensor based Shake Reduction system. Combine that with a good lens, careful exposure and a little patience and the K 5 II remains capable of producing photographs that look superb on a modern screen or in print.
The secret is understanding how to work with the camera rather than expecting automatic modes to make every decision for you.
Blue Hour Is Your Friend
The Devon photographs were taken at one of my favourite times for photography, the period immediately after sunset that photographers often call the blue hour. Despite the name, it rarely lasts a full hour. During this period there is still enough natural light in the sky to prevent it becoming completely black, while streetlights, buildings and boats are already illuminated.
That balance is incredibly useful.
Take another look at the Devon harbour scenes. The sky is a rich blue rather than pure black. This gives the photograph depth and provides a beautiful contrast with the warmer lights around the harbour. If the same photograph had been taken much later, the sky would probably have become a featureless dark area and the brightest artificial lights would dominate the scene.
The lesson is simple. If you want atmospheric night photography, do not necessarily wait until it is completely dark.
Arrive before sunset. Find your composition, watch how the light changes and start shooting as artificial lighting begins to balance with the remaining daylight. There may only be ten or twenty minutes when everything looks exactly right.
With the K 5 II, this also gives you a technical advantage. Because there is still some ambient light available, you can use lower ISO settings and retain more detail.
Start with RAW
If your aim is to get the absolute best image quality from the K 5 II, shoot RAW.
The camera can produce very good JPEG files, but low light photography regularly produces scenes with an enormous range between the darkest shadows and the brightest lights. A harbour at night might contain almost black boats alongside intensely bright shop signs or streetlights. RAW gives you much more freedom to recover information from those extremes later.
This matters particularly with the K 5 II because its sensor has excellent shadow recovery capabilities at lower ISO settings.
If part of a building looks slightly too dark, there is often a surprising amount of information hidden inside that shadow when working with the RAW file. Trying to recover the same area from a JPEG can reveal compression artefacts and colour problems much more quickly.
I would choose DNG or PEF depending on your preferred editing software. Image quality is not something I would worry about between the two. The important thing is retaining the maximum amount of data recorded by the sensor.
Use a Tripod Whenever You Can
For scenes such as these Devon harbour photographs, the single biggest improvement you can make is to use a tripod.
The Shake Reduction system inside the K 5 II is excellent for handheld photography, but a tripod changes the game completely. Once the camera is physically stable, you no longer need to increase ISO simply to maintain a hand holdable shutter speed.
Instead, you can use ISO 100 or ISO 80 and allow the shutter to remain open for several seconds.
This produces cleaner images with better colour, smoother tonal transitions and considerably more latitude for editing.
A typical starting point for a harbour scene might be:
ISO 100
Aperture f/5.6 to f/8
Shutter speed between one and ten seconds
The exact shutter speed will obviously depend upon the remaining light.
A longer exposure would also change the character of the water in the Devon images. Small ripples would gradually smooth out and the coloured reflections would become longer and softer. Boats may move slightly during the exposure, though, particularly if they are floating freely, so there is always a balance to be found.
Personally, I like retaining some texture in water. Completely smooth water can look beautiful, but the broken reflections in these photographs have character. They make the harbour feel alive.
Turn Shake Reduction Off on a Tripod
This sounds slightly counterintuitive, but when the K 5 II is mounted securely on a tripod, turn Shake Reduction off.
The stabilisation system is designed to detect and compensate for camera movement. When the camera is already perfectly stable, there is nothing for it to correct. Under certain conditions a stabilisation system can actually introduce tiny movements while attempting to compensate for motion that does not exist.
Handheld, leave Shake Reduction on.
Tripod mounted, turn it off.
This is one of those small habits that becomes automatic after a while.
Use the Two Second Timer
Even on a tripod, simply pressing the shutter button can cause vibration.
Fortunately, there is an easy solution. Use the K 5 II's two second self timer or a remote release. Press the button, take your hand away and allow the camera to settle before the exposure begins.
This is particularly useful when using shutter speeds around one quarter of a second through to several seconds.
If you are photographing a completely static subject and want to squeeze every possible bit of sharpness from the camera, it is worth taking your time. Low light photography rewards patience.
You are no longer trying to capture a fleeting sports moment. The harbour is not going anywhere.
Compose carefully, check the edges of the frame, examine the exposure and then take the photograph.
Protect the Highlights
One of the biggest problems in night photography is overexposing artificial lights.
Look at the Devon images and you can see just how many different light sources are present. Illuminated shop fronts, streetlights, building windows and coloured signs are scattered throughout the scene. These lights are dramatically brighter than the surrounding buildings and water.
Your instinct may be to brighten the overall photograph because the scene looks dark on the rear screen.
Be careful.
Once a bright highlight becomes completely white, the detail is gone. RAW files can recover an impressive amount, but they cannot recreate information that was never recorded.
I would therefore expose slightly conservatively.
Use the histogram rather than relying entirely on how the picture looks on the LCD. Make sure the graph is not heavily crushed against the right hand edge. A few tiny blown highlights around individual lamps are usually unavoidable and not something I would worry about, but large white areas should be avoided.
With the K 5 II, allowing the shadows to remain slightly dark is often the better choice because those shadows can be lifted surprisingly well afterwards.
This plays directly to one of the strengths of its sensor.
ISO Is Not the Enemy
There is a tendency among photographers to treat ISO as though increasing it is automatically bad.
It is not.
If the camera is on a tripod and the subject is stationary, absolutely use ISO 100 and take advantage of maximum image quality. However, if you are walking around Devon in the evening without a tripod, you need to approach the situation differently.
A sharp photograph at ISO 1600 is considerably better than a blurred photograph at ISO 200.
The K 5 II performs remarkably well at ISO 800 and 1600, particularly when exposure is correct. ISO 3200 is also perfectly usable when necessary, especially with modern noise reduction software.
What causes more problems is heavily underexposing an image at high ISO and then attempting to brighten it dramatically later.
Get the exposure as close as possible in camera.
When shooting handheld, I would happily let the K 5 II rise to ISO 1600 before worrying about image quality. With a reasonably fast lens and Shake Reduction enabled, this opens up plenty of possibilities after sunset.
Choose the Aperture for the Photograph
There is no single perfect aperture for night photography.
For a harbour landscape like the Devon scenes, I would generally aim somewhere around f/5.6 to f/8 when using a tripod. This provides good depth of field and most lenses perform extremely well around these apertures.
You may also begin to see attractive star shaped effects around small bright lights as the aperture becomes smaller.
If you are photographing handheld, however, opening the lens to f/2.8, f/2 or even wider can make an enormous difference. Every additional stop of light allows either a faster shutter speed or a lower ISO setting.
The trade off is depth of field.
That can actually be used creatively. A photograph of one boat in the harbour with distant lights becoming soft circles in the background could look wonderful. Not every low light photograph needs everything to be perfectly sharp from foreground to horizon.
Focus Carefully
Autofocus becomes more difficult as light levels fall, although the K 5 II was particularly good in low light for a DSLR of its generation. Pentax's SAFOX X autofocus system was designed to continue focusing in very dim conditions.
Even so, give it something useful to focus on.
Do not point the autofocus sensor at an area of completely dark water and expect miracles. Aim at a brightly illuminated edge of a building, a boat with good contrast or another clearly defined object at roughly the correct distance.
For tripod work, another option is to autofocus once and then switch the lens to manual focus. This prevents the camera trying to refocus every time you take another exposure.
Zooming into Live View can also be useful when precise focus matters.
Watch Your White Balance
Night scenes frequently contain a strange mixture of colour temperatures.
The Devon photographs demonstrate this beautifully. There are cool blue tones in the sky and water, warmer yellow lights from buildings, bright white LEDs and occasional coloured lights scattered around the harbour.
Trying to make every light source perfectly neutral would destroy much of the atmosphere.
This is another reason to shoot RAW. White balance can then be adjusted afterwards without damaging the file.
Auto White Balance on the K 5 II will often provide a reasonable starting point, but I would resist making the final photograph too warm. Keeping some of the natural blue in the evening sky creates a wonderful complementary contrast against the warm waterfront lighting.
That contrast is one of the strongest characteristics of these Devon photographs.
Reflections Are Part of the Composition
When photographing harbours, rivers or lakes at night, do not think of reflections as an accidental by product of the scene.
They are part of the composition.
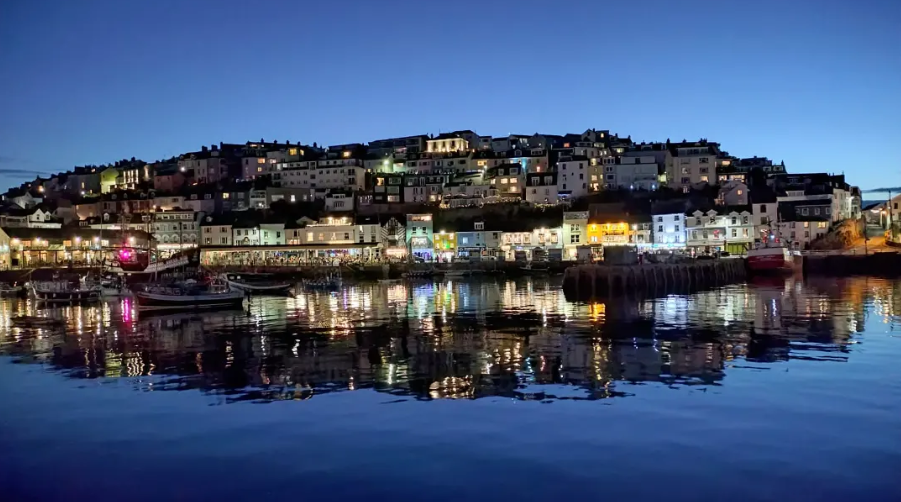
In the Devon images, almost half of the visual interest is beneath the boats rather than above them. Lights from the waterfront stretch downward across the harbour, distorted by tiny movements in the water.
The second photograph demonstrates this particularly well. The broad area of calm water gives the illuminated town room to reflect, creating an almost symmetrical relationship between the hillside and its reflection.
When composing a scene like this, deliberately decide how much water to include.
Sometimes lowering the camera slightly can increase the strength of the reflections. At other times, placing the horizon higher in the frame gives the water more importance.
In the first image, the swans provide another useful foreground element. They give the photograph scale and lead the viewer into the harbour beyond.
These are exactly the details worth looking for when you arrive at a location.
Do Not Overdo Noise Reduction
Modern editing software can make an old camera look astonishingly good at high ISO, but noise reduction should be handled carefully.
Too much noise reduction can remove the fine texture that makes a photograph look natural. Buildings begin to look painted, water becomes unnaturally smooth and small details disappear.
A little grain is not a disaster.
In fact, I would rather see a small amount of natural luminance noise than an aggressively processed image with no texture.
Colour noise is generally more distracting and can be reduced more strongly. Luminance noise should usually be treated more conservatively.
At ISO 100, the K 5 II files should need very little noise reduction anyway.
Long Exposure Noise Reduction
The K 5 II also offers long exposure noise reduction.
For very long exposures this can help remove hot pixels and certain types of sensor noise by taking a second dark frame after the original photograph. The disadvantage is that the camera becomes unavailable for approximately the same length of time as the original exposure.
Take a thirty second photograph and you may then wait another thirty seconds while the camera processes it.
For occasional carefully composed exposures this is perfectly acceptable. If the light is changing rapidly during blue hour, however, I would normally prefer to keep shooting and deal with noise later.
Those few minutes of perfect evening light disappear surprisingly quickly.
The K 5 II Still Has Plenty to Offer
It is easy to become obsessed with new cameras. Modern mirrorless bodies offer extraordinary autofocus, incredible high ISO performance and features that would have seemed impossible when the K 5 II appeared.
But photography is not simply a competition between specification sheets.
The photographs from Devon demonstrate something much more important. Give an older camera good light, an interesting location and sensible technique and it can still produce beautiful photographs.
The K 5 II has a particularly attractive combination of qualities for this type of work. Its sensor has excellent dynamic range, its Shake Reduction system makes handheld shooting practical, its weather sealed body inspires confidence outdoors and its low light autofocus remains surprisingly capable.
Most importantly, it produces excellent RAW files.
Put it on a tripod beside a Devon harbour as evening arrives, keep the ISO low, expose carefully for those glowing waterfront lights and allow the shutter to stay open for a few seconds. Watch the blue deepen in the sky and the reflections strengthen across the water.
That is where the K 5 II really comes alive. You do not need the newest camera, you need the right light, a good composition and the patience to be there when everything comes together.
